

You can still download it at iloveknk
Sure Cuts A Lot (SCAL) is the closest similar software i think.
You can find great tutorials for both MTC and SCAL at
iloveknk.com
Below is some MTC Tutorials I have made
also some links to iloveknk for some videos
Using Layer Window in MTC to get a file ready for a Laser
You need to group the pieces into Score, Engrave and Cut
My recording app only lets me record 5 minutes free,
See image below video for all the steps
Wow, I need a different recording app!
The video below shows you how the layer window can make it easier
Here is an image of the steps
You can also get the blackout by using break usually.
Also you do not have to color the do nothing pieces, i just do lol

Back To Menu
Tips and Tricks in MTC
To get a straight line with the eraser or pencil,
Use the Contrast Mat,
hold down control, draw line,
and look for the tiny green lines
to show up on both ends of the line,
which means its straight

Viewing the Letters & extra Characters more Easily
Make sure All Glyphs is checked
Hover mouse on the left edge of the letter window
till see the arrows
Then with left mouse Drag the Letter Window to the Left
to Stretch the Letter window out
Now can see a lot more characters at one time

Name the Layers to what you would like
In the layer window, you can double click
on the name and rename it

Select Pieces in the Layer window all at one time
You can hold shift in the layer window
and select pieces, then click on the little +
to move them to the top and group them,
then can join them if want to
Then can click on the eye to hide it
Then Click the trash can, to remove all the empty layers
then do again with other pieces want in one layer
Helpful if a lot of pieces on your mat,
and want to put everything of one color in one layer,
or like if have 3 gnomes and want to
put all their eyes in one layer (haha joke)
Pixel Trace parts of an image
Hold down the control key and
select around the part you want to trace
It will show a white box around what you are tracing

Use Pixel Trace to turn images into Silhouettes.

Do 2 Pixel Traces on the same image at one time
Say you want a blackout for a silhouette
AND you want to trace the image for the pieces
You can do both in one pixel trace.
Do your blackout path, click on import,
but then click on Continue Tracing
and uncheck Blackout Path
Then do your 2nd Trace.
Same if doing a Texturize Path
click on import, then continue,
then uncheck texturize path
then do your 2nd Trace
If you have letters with a lot of spots in them,
you do not want.
First try split, then weld,
If that dont work
Make your letters small, split by glyphs
Select all the letters
Make a shadow layer of 0
Then delete original one
If that don't work, can do it this way
Select all the letters, split by glyphs
Make a shadow layer of 0
Then delete original one
Break
Edit > Delete by Shape Area
put slider at maximum
then rejoin letters
Back To Menu
How to make an Outline of your Text,
Silhouette, or pieces of your project
For a quick thin outline
Make a Copy of what want to outline,
Then Paste in Place, Then Join
If want a thicker outline
Select all you want to Outline
Then Use Shadow Layer,
Adjust thickness of the outline,
then Join
(i did a video of this farther down on my page)
Back To Menu
Click Here for iloveknk Shortcuts pdf
Note 1: Can stretch letters out without deforming them
by: Add text, split by Glyphs, Select all letters,
hold down the control key, and use
right arrow handle to stretch out letters.
Note 2: Evenly Space Letters by: select all letters,
and click on right keyboard bracket ]
Note 3: Lineup text or shapes
by: Select all want to lineup,
using your keyboard push B for lineup
on the bottom, or T for lineup on the Top
(does not matter if in caps or not)
Press S for Stack
Back To Menu
Outline or Fill Everything on your Mat

Back To Menu
How to use Basic Shapes for Quick Access to Shapes that You make, and frequently used images

Back To Menu
Make Your Own Color Charts
Sometimes it is hard to get the color you want in MTCs color chart
You can copy or write down RGB Codes on the Charts you find
Then Enter the codes in MTCs Builtin Color Chart
(not my favorite way to do it)
I'd rather take a few minutes to make charts can always use.
Below is other options
You can Save a MTC File with Your Own Color Charts
and can also save your own color charts in Basic Shapes
Click here for a MTC & SVG Color Chart in my Drive
Making Your Own Color Charts Tutorial
(Don't Forget to Save the mtc file)
And Look at (Using) Your Own Color Charts Next Tutorial
You can also copy and paste in place, and drag away a color from chart you are making, and use the Builtin color slider to adjust the color for even more colors
(Using) Your Own Color Charts


that you just put on your mat,
and in MTCs Builtin Color Chart
Add To Custom Colors to use for your project
Really easy once you get your color charts made
Back To Menu
Adding your color chart colors to Custom Colors

You just click on an empty box,
then move the crosshair and pointer slider
to adjust till find a color you want
Then click Add To Custom Colors
Back To Menu
Knife vs Eraser
Back To Menu
Inverse Eraser VS Pencil

Back To Menu
Using Boolean join to Split or Break apart a shape

Back To Menu
Shadow Layer to thicken or thin, and to make outlines of a silhouette
You can use a positive number to thicken or negative number to thin
If making a outline use join after make shadow layer to join together the silhouette and shadow layer.


Shadow Layer > Join
Back To Menu
Shadow Layer to add Colored Layers

Back To Menu
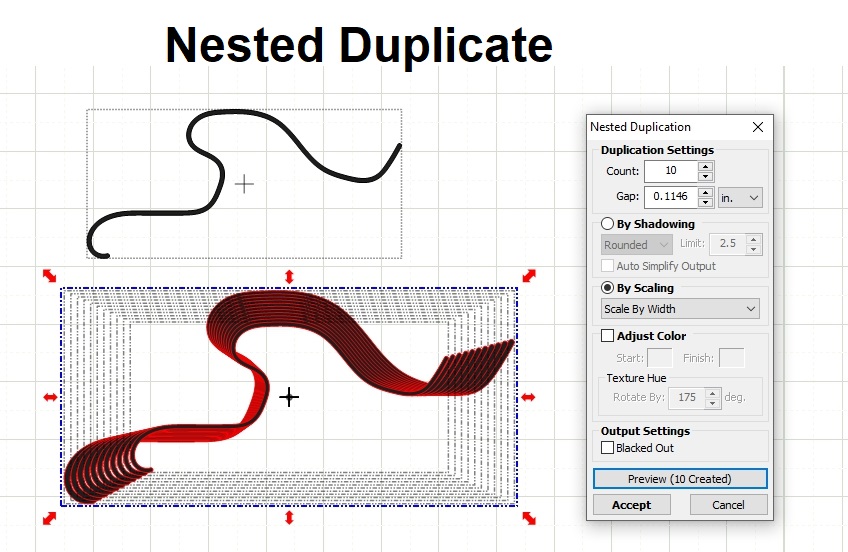
Tricks can use to make Curves
(Also see my Bezier Curves and straight lines Tutorial)
Back To Menu

Back To Menu

Back To Menu

Wrap Words to a Circle Video
Back To Menu

Back To Menu

Back To Menu

Boolean Join Intersect Video
I moved heart layer to bottom before started the video lol
Back To Menu
Can use to adjust any of your projects,
Here is a example using the Letter A
Back To Menu
Back To Menu
The image needs a little editing, but it scanned pretty well.
The Video works, i just had a space before it i guess
and Count Difference)
Stacked is a little more clean, and Color Scans Only is Broken into pieces more


This image had a White Background i show in 2 Color Scans
In my video i broke the white background, deleted the background,
and it left a white silhouette, which i changed the color to a black silhouette.

Back To Menu
Using Palette in Pixel Trace to grab a piece or pieces of an image
I got distracted a few times making the video lol
Back To Menu
Using MTC to make Sewing Patterns
Below is a link to a iloveknk tutorial on using
Pixel Trace to divide images for sewing patterns
Using Pixel Trace to Simulate Boolean Join
Back To Menu
Using Texture on a silhouette or shape


Back To Menu
Lining up the Letters over the image,
so get parts of the image you want on the letters

Filling Lettering with a Digital Paper
Back To Menu
Push in on one side,
and Pull Out on the other side
Back To Menu
Fun with the Pencil

Back To Menu
Different Ways to Use the Pencil
Back To Menu
Puzzle Generator hidden in your Make The Cut Folder in Program Files
(JSPGen.exe) is the file to click on
I see a lot of already made puzzle blanks online, but i gave this a try anyway

I have not got around to using the Advanced Feature yet.
But the Puzzle exports as an SVG.

Instructions


Back To Menu
Fun with Create Stars and Polygons

Fun with Create Stars and Polygons Video
Back To Menu


Back To Menu
I called it Swirl Shape below


Back To Menu


Back To Menu


Back To Menu


Like only one You, but Larger letters, and the Name Larger
and Maybe just have the name in one heart
Back To Menu
Maybe a new Hotel Design??
with a Fun Park or a Beautiful Garden in the middle :) LOL!
Back To Menu


Back To Menu
Bezier Curves and Straight Lines

Back To Menu
Uing Tiler to Divide an image to print larger than one sheet of paper
iloveknk has a really good video on how to do that,
click on the link below for her Video
MTC - Filling Tiled Shapes with Original Raster
Notes: Pixel Trace image using Maximimum Theshold & Texturize path, Then Trace again Blackout path, size them, Tiler, Copy original image, paste in place on all pages, Line up with piece on top, then move piece to bottom, Select both image and piece, join, break, drag away original image. repeat all pieces
Conical Warp Cone Size
Back To Menu
Conical Warp Wrap around a Glass

Conical Warp Words Video
Back To Menu
Conical Warp Settings Video
Back To Menu
Bezier Warp Words
Back To Menu
Bezier Warp


Back To Menu
Fill Words to Shape using MTC & Inkscape
I followed a iloveknk video for this. Filling A Shape with Text
My Results Below

Put shape using on the mat
Then copy the shape
and then in Inkscape
Top toolbar Edit > Paste,
Then Edit > Duplicate,
Drag top one off but save
the other one,
only the duplicate will work.
Then in left toolbar
click on the A to Add Text
hold down the left mouse
and drag out the text box Then type in the words,
enough to fill the shape. Then select all the words
and click on the text alignment
at the top and center words.
Then drag the bottom right arrow
to adjust the lettering in the shape.
Then can click on text and put
curser before or after words and
use space bar to tweak spacing.
Then click on path up in the toolbar,
then click on Combine.
Then delete the shape you didn't use
Then Copy just the text
Go back to MTC and
click Paste in Place,
Then Drag to your shape used
(I could not get the control shift
and arrow to work like in her video, so i just used the cursor behind
words and in front of words to tweat them)
Back To Menu


No comments:
Post a Comment
Love Comments, but Please No politics or anything rude. No advertising unless a similar website with design images.